28 de março de 2023 • 4 min de leitura
Setup Fish + Starship + NVM (Ubuntu / Linux / WSL2)
A step-by-step about how install and config Fish + Starship + NVM on Linux
Introduction
These days I tried to use Fish as my default shell on WSL2, I suffered a little to discover the details and how to make everything works together, so I wrote this tutorial to help any other folks who are on this same journey.
Fish install
On their own site, fish has a link to the Ubuntu package with PPA, you can check the updated commands on the link below, case you need them:
sudo apt-add-repository ppa:fish-shell/release-3
sudo apt update
sudo apt install fish
docs: fish shell - 3.x release series : “Fish shell maintainers” team (launchpad.net)
Changing the default terminal
You can access fish by typing "fish", or setting it as your default terminal. To set it as default, you need to check where is located the bin of your fish shell, to do that, run the command:
which fish
# output
# /usr/bin/fish
This location can change depending on the user, distro, WSL, mac etc. So, it's important to check what's your output. Now you have to access the list of shells and add the location of your fish shell:
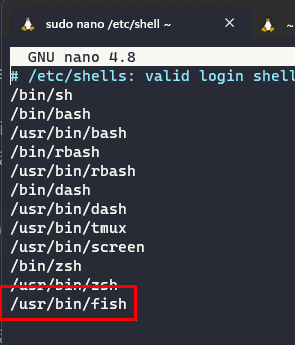
sudo nano /etc/shellsAdd the path to the end of the file:

You can use this command to do that too (check the paths):
echo /usr/local/bin/fish | sudo tee -a /etc/shellsNow run the following command to change the default shell to fish:
chsh -s /usr/local/bin/fish💡 Important note: Check if you don't do anything wrong so far, because if you run the command to change the shell, and if you have any warning messages, open another terminal without closing this one you just ran the command, and test if it's everything ok. If we have a problem, run the command substituting the path to /bin/bash or your previous bash and consulting better the fish docs to understand the problem.
docs: Introduction — fish-shell 3.6.1 documentation (fishshell.com)
Install Starship
Starship is a customizable prompt for different shells, if you don’t want this feature you can skip this step.
Install:
curl -sS https://starship.rs/install.sh | shAdd this line to the end of your file:
# ~/.config/fish/config.fish

starship init fish | source
docs: Starship
Install Fisher
Fisher is a plugin manager for Fish, and we will use the handler easier with all our plugins, the NVM plugins, and configs too.
Run the following command to install:
curl -sL https://raw.githubusercontent.com/jorgebucaran/fisher/main/functions/fisher.fish | source && fisher install jorgebucaran/fisherUsing NVM through a plugin (nvm.fish)
This is a plugin to quickly install NVM and use it without any forward configurations:
fisher install jorgebucaran/nvm.fishBut to do some other nvm default configs, you will need to check the docs, for example, to set the default node version when you open a shell, we need to configure it with this command:
set --universal nvm_default_version v18.4.0docs: https://github.com/jorgebucaran/nvm.fish
Using the NVM default installation
The other option is to install the NVM as the default installation:
Run the cURL or Wget command:
curl -o- https://raw.githubusercontent.com/nvm-sh/nvm/v0.39.3/install.sh | bashwget -qO- https://raw.githubusercontent.com/nvm-sh/nvm/v0.39.3/install.sh | bashThen you will need to install a plugin called Bass.
Install Bass
Bass is a plugin for fish that allows you to use utilities written for Bash in the fish shell (that we will need to run the NVM):
fisher install edc/bassAdd this configuration to your config.fish file:
# ~/.config/fish/config.fish

function nvm
   bass source $HOME/.nvm/nvm.sh --no-use ';' nvm $argv
end
Check if the path is correct of your NVM installation
Now you can run NVM as if it were a normal installation.
Conclusion
This is a brief tutorial to help you with some tips and a step-by-step to make it easier when we need to configure these tools. I wish it will be helpful to you.
If you have any questions or suggestions, don't hesitate to comment below, until next time.😉
Buy Me a Coffee 
As a good programmer, I know you love a little coffee! So why don't you help me have a coffee while I produce this content for the whole community?💙
With just $3.00, you can help me, and more importantly, continue to encourage me to bring more completely free content to the whole community. You just need to click on the link below, I'm counting on your contribution 😉.
Buy Me a Coffee
Subscribe to our Newsletter!
By subscribing to our newsletter, you will be notified every time a new post appears. Don't miss this opportunity and stay up-to-date with all the news!
Subscribe!