21 de junho de 2023 • 13 min de leitura
How to Upload, Download and Delete Files with Strapi, React, and AWS S3
How to integrate all these tools to upload, download and delete files through Strapi API/Admin
Introduction
Today we gonna see how we can create components in React to upload, download and delete files using Strapi as our backend. Let’s also look at how we can configure Strapi to use AWS S3 as our file host provider, and how we can customize Strapi to delete the media files attached to our entries when we delete those entries, because this is not standard behavior in Strapi.
Creating your backend with Strapi
Initially, we need to create our backend infrastructure, and for that we will use Strapi, so we just install Strapi with the quickstart script:
npx create-strapi-app backend --quickstartAnd create a content type for our tests:

Nothing new here, just created a “test” table, with a column called name (type text) and files (type multiple media).
To better understand how Strapi works, you can consult the docs.
React Upload Component
To create our React Upload Component, the hardest challenge is to understand how you need to submit our frontend form to the Strapi API.
The initial phase entails constructing the form. Given that you are unlikely to employ the native form in React, for the purpose of this illustration, we shall utilize React Hook Form to manage our form.
import { useForm } from 'react-hook-form'

const UploadComponent = () => {
  const { register, handleSubmit } = useForm()

  const onSubmit = async (values: any) => {
    console.log(values)
  }

  return (
    <form onSubmit={handleSubmit(onSubmit)}>
      <input type="text" {...register('name')} />
      <input type="file" {...register('files')} />

      <button type="submit">Send</button>
    </form>
  )
}

export default UploadComponent

Handle the form to submit to Strapi
In order to correctly handle the FileList and send it to our backend, we must undertake the following steps.
To meet Strapi's requirement, media files need to be sent within a FormData object. Hence, we must create a new FormData object and attach all the relevant fields to it.
To adhere to Strapi's specifications, we should gather all non-media data into a "data" object and append it to our FormData instance in the following manner:
const onSubmit = async (values: any) => {
  const formData = new FormData()
  const { medias, ...rest } = values

  formData.append('data', JSON.stringify(rest))
}
Now we need to add the files to the FormData object, we need to use the formData.append API with careful attention to its parameters:
append(name, value, filename)
The name needs to be the database column name preffixed with “files”.
For example, if was column name was “documents”, we will use “files.documents”.
So, we will iterate our FileList, to add all files to your FormData:
const onSubmit = async (values: any) => {
  const formData = new FormData()
  const { files, ...rest }: { files: FileList; rest: any } = values

  formData.append('data', JSON.stringify(rest))

  Array.from(files).forEach((file) => {
    formData.append('files.files', file, file.name)
  })
}
And finish by sending the FormData to the Strapi endpoint:
const UploadComponent = () => {
  const { register, handleSubmit } = useForm()

  const onSubmit = async (values: any) => {
  const formData = new FormData()
  const { files, ...rest }: { files: FileList; rest: any } = values

  formData.append('data', JSON.stringify(rest))

  Array.from(files).forEach((file) => {
    formData.append('files.files', file, file.name)
  })

  await fetch('http://localhost:1337/api/tests', {
    method: 'post',
    body: formData
  })
}
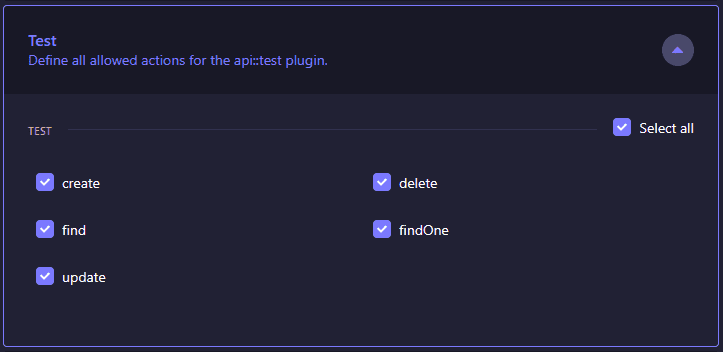
Ensure that public access is enabled for the routes of our content-type, otherwise, you may encounter a forbidden error.
For updated examples in newer versions, see the documentation below:
Setup AWS S3 as our File Host Provider
We’ve already learned how to send files to Strapi and save them locally, our next goal is to configure Strapi to store the files on the cloud using AWS S3.
Setup Strapi
To achieve this, let’s start by installing the AWS S3 plugin:
# using yarn
yarn add @strapi/provider-upload-aws-s3

# using npm
npm install @strapi/provider-upload-aws-s3 --save
And then create/update the plugins config file in our Strapi project:
// ./config/plugins.ts

export default ({ env }) => ({
  upload: {
    config: {
      provider: 'aws-s3',
      providerOptions: {
        s3Options: {
          accessKeyId: env('AWS_ACCESS_KEY_ID'),
          secretAccessKey: env('AWS_ACCESS_SECRET'),
          region: env('AWS_REGION'),
          params: {
            Bucket: env('AWS_BUCKET')
          }
        }
      },
      actionOptions: {
        upload: {},
        uploadStream: {},
        delete: {}
      }
    }
  }
})
If you want to see the thumbnails that Strapi creates in the admin panel, we need to update the security middleware policy, in the middleware config file:
// ./config/middlewares.ts

export default ({ env }) => [
  'strapi::errors',
  {
    name: 'strapi::security',
    config: {
      contentSecurityPolicy: {
        useDefaults: true,
        directives: {
          'connect-src': ["'self'", 'https:'],
          'img-src': [
            "'self'",
            'data:',
            'blob:',
            'market-assets.strapi.io',
            `${env('AWS_BUCKET')}.s3.amazonaws.com`
          ],
          'media-src': [
            "'self'",
            'data:',
            'blob:',
            'market-assets.strapi.io',
            `${env('AWS_BUCKET')}.s3.amazonaws.com`
          ],
          upgradeInsecureRequests: null
        }
      }
    }
  },
  'strapi::cors',
  'strapi::poweredBy',
  'strapi::logger',
  'strapi::query',
  'strapi::body',
  'strapi::session',
  'strapi::favicon',
  'strapi::public'
]
Within the Strapi Admin, we can configure other good settings in Settings > Media Library. Depending on the requirements of your application, you can choose to enable or disable the generation of other files and optimizations.

AWS S3 Setup
To configure AWS S3, it is necessary to have an AWS account. If you don't have one, we will need to create it.
Please follow these steps to create a bucket in S3 and configure the important settings:
- Go to the AWS Management Console and sign in to your AWS account.
- Navigate to the S3 service.
- Create a new bucket by selecting the "Create bucket" button.
- Follow the instructions to specify the bucket name, region, and other necessary configurations, taking note of the important settings that need to be set.
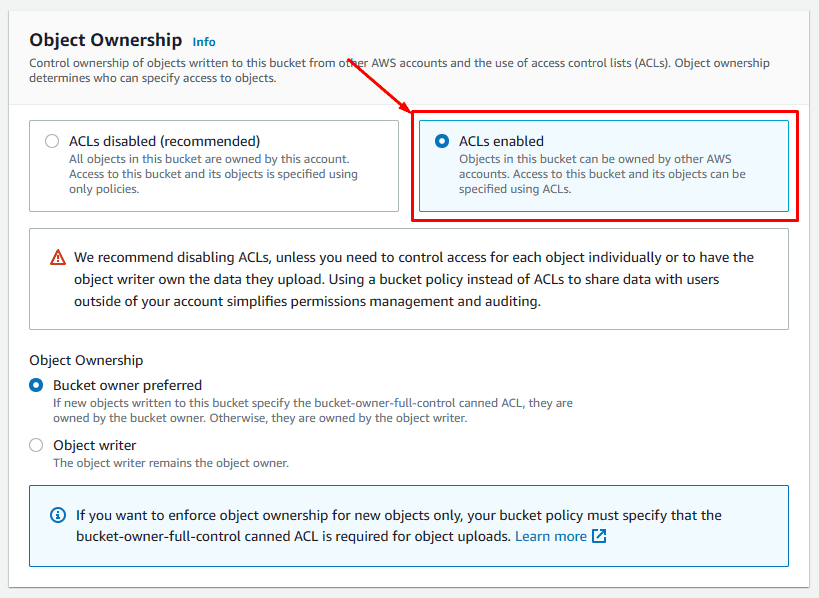
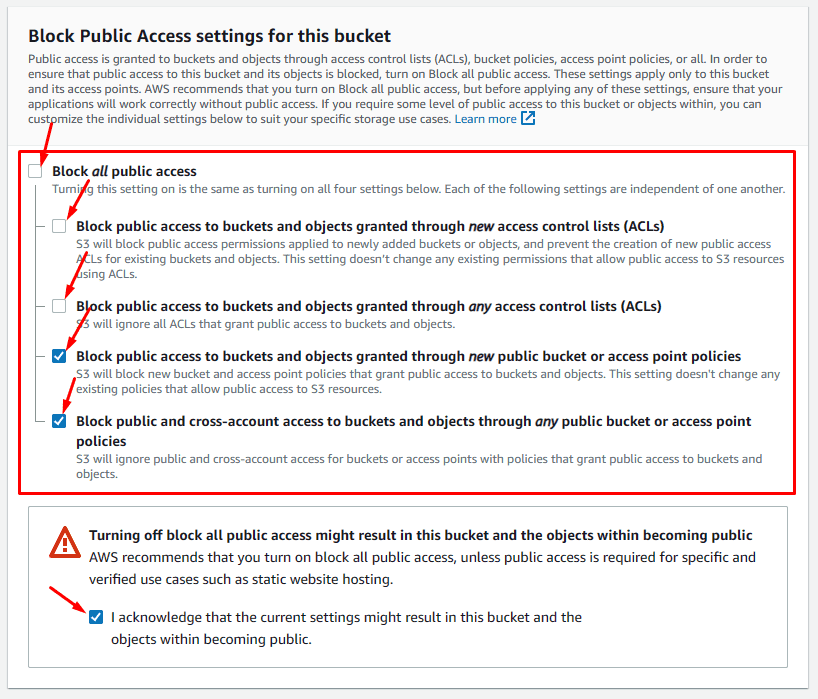
Leave the remaining settings as default and proceed to the next step.
- Select the bucket you just created.
- Navigate to the Permissions tab.

Update the CORS policy, like that:
[
  {
    "AllowedHeaders": ["*"],
    "AllowedMethods": ["GET"],
    "AllowedOrigins": ["*"],
    "ExposeHeaders": [],
    "MaxAgeSeconds": 3000
  }
]
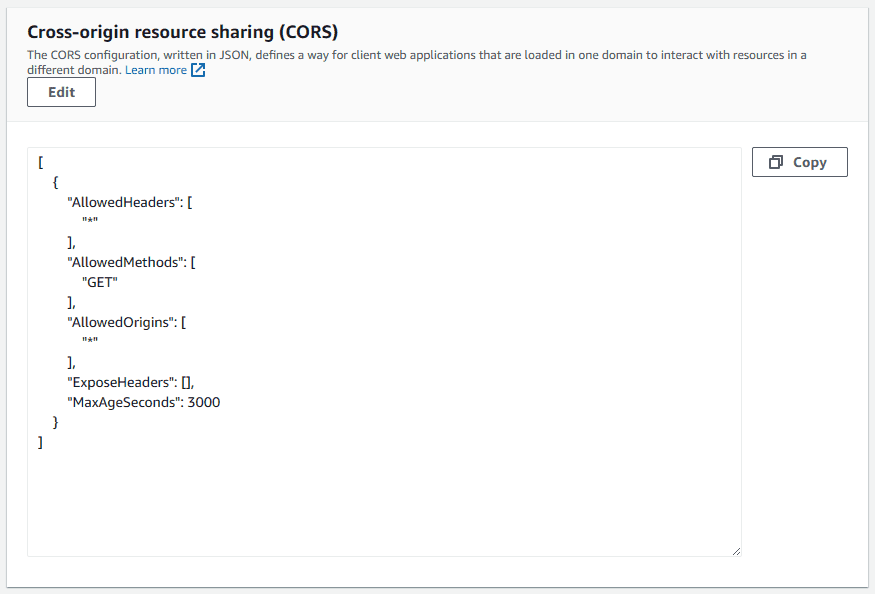
You can allow or restrict this setting as you like, it basically concerns which URLs can get the information, see and manipulate your files.
That done, we can fill two of our env variables in Strapi:
# .env
AWS_BUCKET=my-test-strapi-bucket
AWS_REGION=us-east-1
To obtain the credentials necessary for uploading files, we need to create a user in the AWS Identity and Access Management (IAM) console. Follow these steps:
- Access the AWS Management Console.
- Navigate to the IAM service.
- Select Users and create a new user.
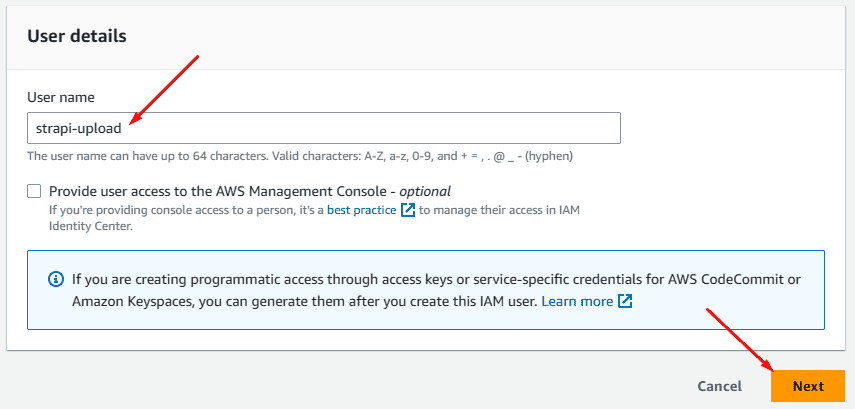
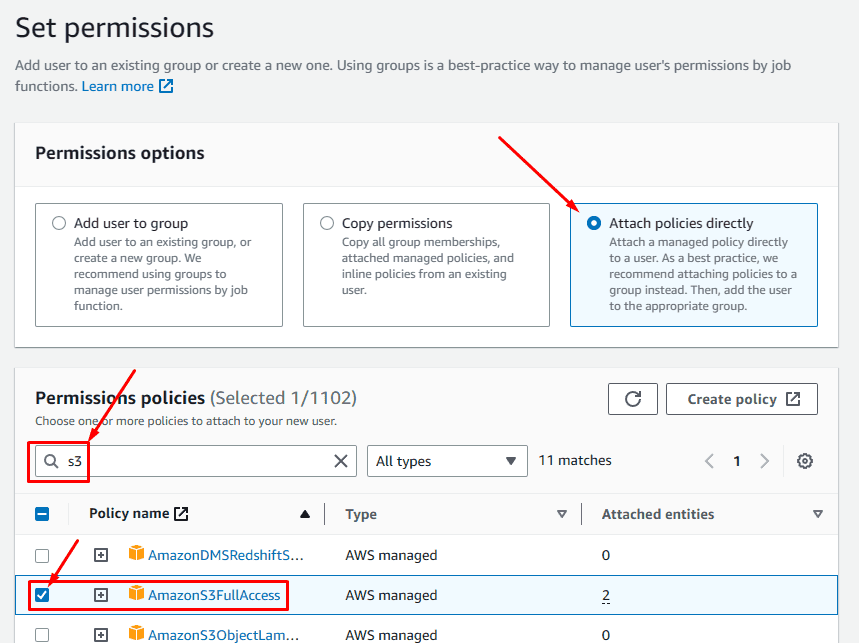
For the remaining settings, you can leave them as default.
Next, click on the user you just created and go to the "Security credentials" tab. From there, you can create a new access key.
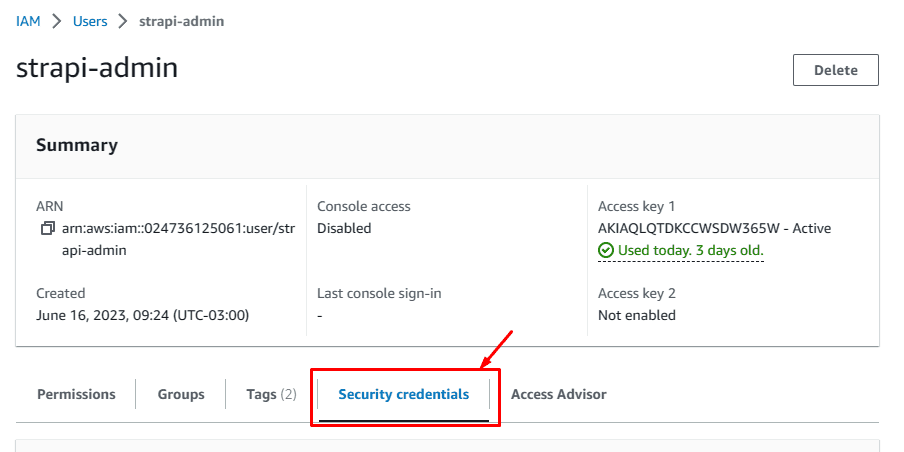

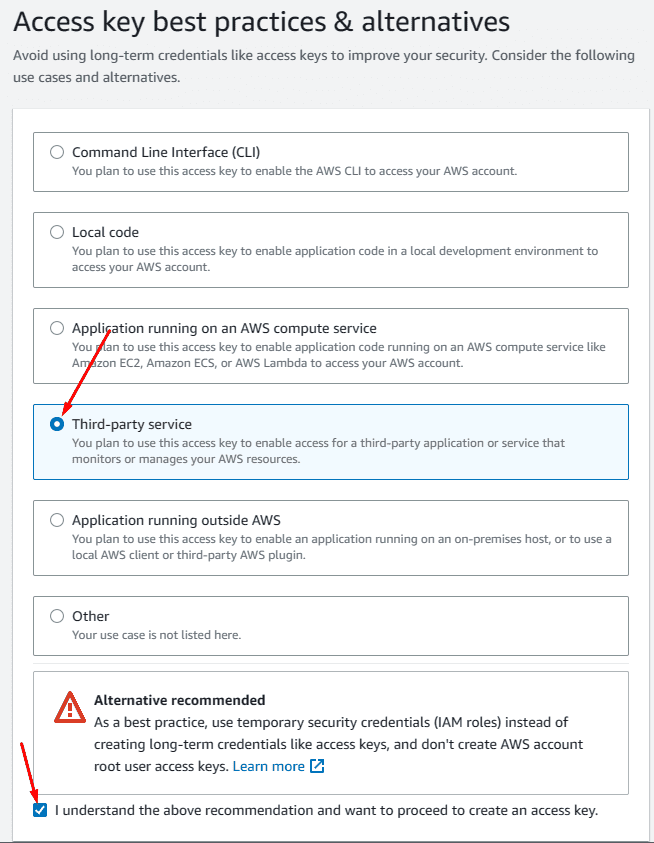
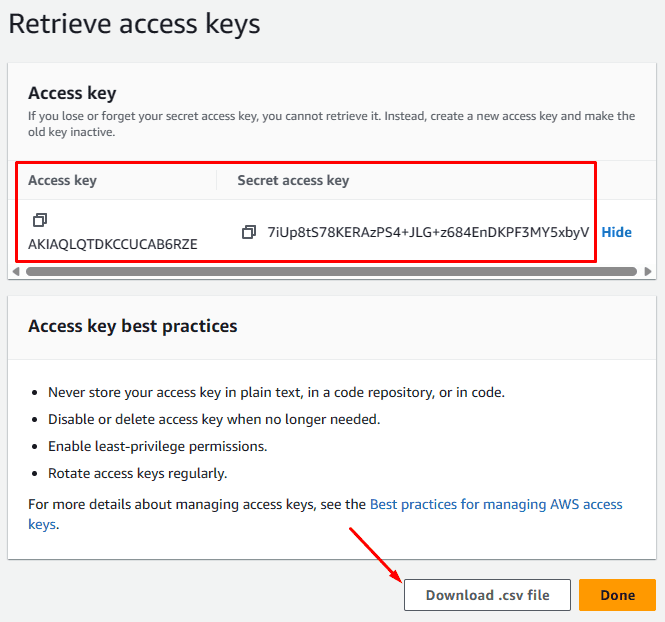
Now save your keys and place them in your Strapi env variables:
# .env
AWS_BUCKET=my-test-strapi-bucket
AWS_REGION=us-east-1
AWS_ACCESS_KEY_ID=AKIAQLQTDKCCUCAB6RZE
AWS_ACCESS_SECRET=7iUp8tS78KERAzPS4+JLG+z684EnDKPF3MY5xbyV
Testing upload
Now we can test again that our upload component is working and your files have been saved to S3:

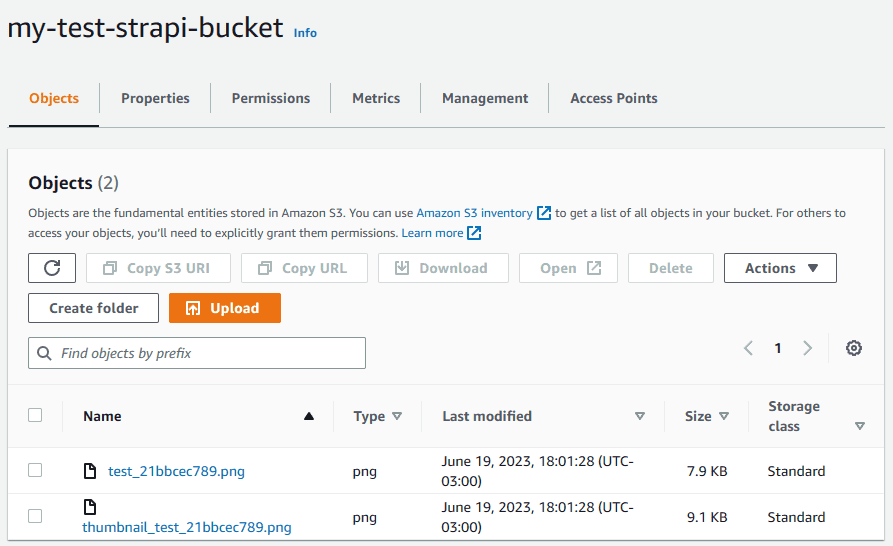
For more details and updated documentation, see the articles below:
How to Set up Amazon S3 Upload Provider Plugin for Your Strapi App
Downloading our Files from S3
After successfully uploading the file to S3, we now need to understand how we can download it. To do this, we first need to get the URL of the file from AWS.
We can get the URL manually through the Strapi Admin interface or by making a GET request to the API to retrieve all entries and retrieve the URL for each one.
Once we have the URL, in our React code, we need to implement a function called downloadImage. This function will be invoked when a button is clicked, allowing us to initiate the file download process.
import { useForm } from 'react-hook-form'

const UploadComponent = () => {
  const { register, handleSubmit } = useForm()

  const onSubmit = async (values: any) => {
    const formData = new FormData()
    const { files, ...rest }: { files: FileList; rest: any } = values

    formData.append('data', JSON.stringify(rest))

    Array.from(files).forEach((file) => {
      formData.append('files.files', file, file.name)
    })

    await fetch('http://localhost:1337/api/tests', {
      method: 'post',
      body: formData
    })
  }

  async function downloadImage() {}

  return (
    <>
      <form onSubmit={handleSubmit(onSubmit)}>
        <input type="text" {...register('name')} />
        <input type="file" multiple {...register('files')} />

        <button type="submit">Send</button>
      </form>
      <button onClick={() => downloadImage()}>Download</button>
    </>
  )
}

export default UploadComponent
In the downloadImage function, we will receive the URL of the file on AWS as the first parameter. We need to make a GET request to AWS S3 to retrieve the file using this URL. After obtaining the file, we can create a temporary link with the file attached.
async function downloadImage(imageSrc: string) {
  const response = await fetch(imageSrc)
  const blobImage = await response.blob()
  const href = URL.createObjectURL(blobImage)

	const anchorElement = document.createElement('a')
  anchorElement.href = href
}
After that, we will click on this link, and remove it:
async function downloadImage(
    imageSrc: string,
    nameOfFileDownloaded = imageSrc.replace(/^.*[\\\/]/, '')
  ) {
    const response = await fetch(imageSrc)
    const blobImage = await response.blob()
    const href = URL.createObjectURL(blobImage)

    const anchorElement = document.createElement('a')
    anchorElement.href = href
    anchorElement.download = nameOfFileDownloaded

    document.body.appendChild(anchorElement)
    anchorElement.click()

    document.body.removeChild(anchorElement)
    window.URL.revokeObjectURL(href)
  }
We can modify the downloadImage function to include a second parameter that specifies the name of the file to be downloaded. However, as a default behavior, we can use the name of the file on AWS.
Let's proceed with testing the function by passing a URL of one of our files from Strapi/AWS to see if it works:
import { useForm } from 'react-hook-form'

const UploadComponent = () => {
  const { register, handleSubmit } = useForm()

  const onSubmit = async (values: any) => {
    const formData = new FormData()
    const { files, ...rest }: { files: FileList; rest: any } = values

    formData.append('data', JSON.stringify(rest))

    Array.from(files).forEach((file) => {
      formData.append('files.files', file, file.name)
    })

    await fetch('http://localhost:1337/api/tests', {
      method: 'post',
      body: formData
    })
  }

  async function downloadImage(
    imageSrc: string,
    nameOfFileDownloaded = imageSrc.replace(/^.*[\\\/]/, '')
  ) {
    const response = await fetch(imageSrc)
    const blobImage = await response.blob()
    const href = URL.createObjectURL(blobImage)

    const anchorElement = document.createElement('a')
    anchorElement.href = href
    anchorElement.download = nameOfFileDownloaded

    document.body.appendChild(anchorElement)
    anchorElement.click()

    document.body.removeChild(anchorElement)
    window.URL.revokeObjectURL(href)
  }

  return (
    <>
      <form onSubmit={handleSubmit(onSubmit)}>
        <input type="text" {...register('name')} />
        <input type="file" multiple {...register('files')} />

        <button type="submit">Send</button>
      </form>
      <button
        onClick={() =>
          downloadImage(
            'https://my-test-strapi-bucket.s3.amazonaws.com/test_20de7b62e5.png'
          )
        }
      >
        Download
      </button>
    </>
  )
}

export default UploadComponent
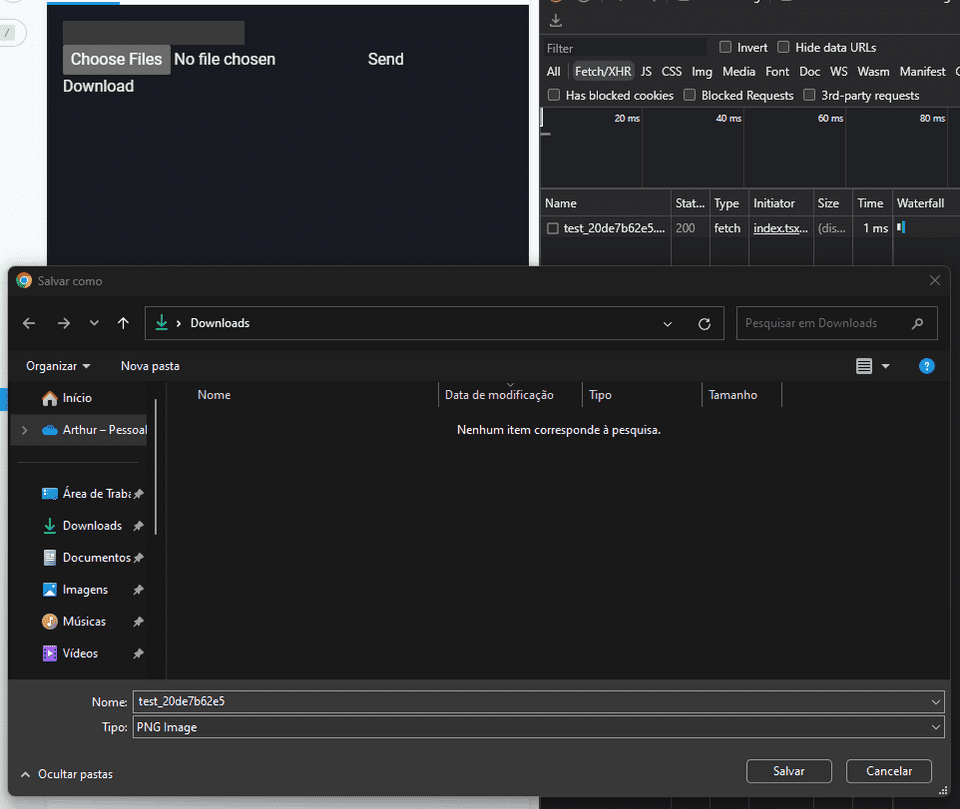
Deleting your files through Strapi API
By default when you have a file related to an entry in Strapi, when you delete the entry these files are not deleted, like in WordPress.
And the ideia here is to create a table (content-type), that you can attach files to each entry, and that files are uniquely associated to those entries, and if one of them is deleted, the associated files will also be deleted.
To do this, we’ll need to customize Strapi to do this behavior for us, and to do this, we use the lifecycle hooks feature.
The lifecycle hooks allow us to trigger functions when certain Strapi queries are executed. In this case, we can utilize the "beforeDelete" lifecycle hook to delete all media files associated with an entry before the entry itself is deleted.
To implement this, we need to create a file named lifecycles inside the API folder of your project.
// ./src/api/test/content-types/test/lifecycles.ts

export default {
  async beforeDelete(ctx) {}
}
We can implement a logic to identify the entry that is being deleted and determine the files associated with it. Subsequently, we can utilize the Strapi API to delete the files from Strapi and remove them from AWS S3 as well.
// ./src/api/test/content-types/test/lifecycles.ts

export default {
  async beforeDelete(ctx) {
    const entry = await strapi.db
      .query('api::test.test')
      .findOne({ ...ctx.params, populate: { files: true } })

    // Delete the files from the upload plugin (including provider-specific logic)
    if (entry.files) {
      if (entry.files.length) {
        await Promise.all(
          entry.files.map((file) =>
            strapi.plugins['upload'].services.upload.remove(file)
          )
        )
      } else {
        await strapi.plugins['upload'].services.upload.remove(entry.files)
      }
    }
  }
}
Remembering that “files” is the name of the collection type field, that is, it needs to be replaced by the name of its field, in the same way for the name of the collection type:
// ./src/api/test/content-types/test/lifecycles.ts

export default {
  async beforeDelete(ctx) {
    const fieldName = 'anyNameOfField'
    const contentTypeName = 'anyNameOfContentType'

    const entry = await strapi.db
      .query(`api::${contentTypeName}.${contentTypeName}`)
      .findOne({ ...ctx.params, populate: { [fieldName]: true } })

    if (entry[fieldName]) {
      if (entry[fieldName].length) {
        await Promise.all(
          entry[fieldName].map((file) =>
            strapi.plugins['upload'].services.upload.remove(file)
          )
        )
      } else {
        await strapi.plugins['upload'].services.upload.remove(entry[fieldName])
      }
    }
  }
}
To ensure that the file deletion logic applies to bulk operations as well, we need to create the same logic for bulk delete operations in addition to individual delete operations, because Strapi provides different lifecycle hooks for each case:
// ./src/api/test/content-types/test/lifecycles.ts

export default {
  async beforeDelete(ctx) {
    const fieldName = 'anyNameOfField'
    const contentTypeName = 'anyNameOfContentType'

    const entry = await strapi.db
      .query(`api::${contentTypeName}.${contentTypeName}`)
      .findOne({ ...ctx.params, populate: { [fieldName]: true } })

    if (entry[fieldName]) {
      if (entry[fieldName].length) {
        await Promise.all(
          entry[fieldName].map((file) =>
            strapi.plugins['upload'].services.upload.remove(file)
          )
        )
      } else {
        await strapi.plugins['upload'].services.upload.remove(entry[fieldName])
      }
    }
  },
  async beforeDeleteMany(ctx) {
    const fieldName = 'anyNameOfField'
    const contentTypeName = 'anyNameOfContentType'

    const entries = await strapi.db
      .query(`api::${contentTypeName}.${contentTypeName}`)
      .findMany({ ...ctx.params, populate: { [fieldName]: true } })

    await Promise.all(
      entries.map(async (entry) => {
        if (entry[fieldName]) {
          if (entry[fieldName].length) {
            await Promise.all(
              entry[fieldName].map((file) =>
                strapi.plugins['upload'].services.upload.remove(file)
              )
            )
          } else {
            await strapi.plugins['upload'].services.upload.remove(
              entry[fieldName]
            )
          }
        }
      })
    )
  }
}
Now, we can create two or more entries with single and multiple files, and test if when we deleted that (single or many), if all the media are deleted too, and if on your bucket the files are being deleted too.
You can proceed with the following steps to test the deletion of files associated with entries in Strapi:
- Create two or more entries with single or multiple files attached to them.
- Trigger the deletion of the entries, either individually or in bulk.
To test the deletion through the Strapi API, you can create a button or make a request to the endpoint localhost:1337/api/tests/:id. Replace :id with the actual ID of the entry you want to delete.
By deleting the entry, the associated files should also be deleted from both Strapi and AWS S3, if the lifecycle hooks and file deletion logic were implemented correctly.
Please note that you should ensure the correct endpoint and ID when making the API request to delete the entry. Additionally, verify that the files are being deleted from both Strapi and your AWS S3 bucket after the deletion.
Conclusion
The only “CRUD operation” we haven't covered is updating a file. However, this operation is often not a good user experience, as users typically opt to delete the existing file and upload a new one. Nevertheless, in cases such as updating a profile avatar, it can be quite useful. To achieve this, we might need to customize the Strapi media handle with the lifecycles hooks as well, but if you follow our example it won't be a challenge.
This article outlines various use cases and how to handle files in React, particularly focusing on file uploading and downloading. The article does not delve into the logic of uploading and deleting files using the AWS SDK, as Strapi handles these aspects in our example. However, if desired, I can create a separate article covering these topics. Please leave a comment below if you would like me to proceed with that.
I hope this article can be useful for you, if you have any questions or suggestions to improve any of the examples shown here, feel free to comment below, see you soon!
Buy Me a Coffee 
As a good programmer, I know you love a little coffee! So why don't you help me have a coffee while I produce this content for the whole community?💙
With just $3.00, you can help me, and more importantly, continue to encourage me to bring more completely free content to the whole community. You just need to click on the link below, I'm counting on your contribution 😉.
Buy Me a Coffee
Subscribe to our Newsletter!
By subscribing to our newsletter, you will be notified every time a new post appears. Don't miss this opportunity and stay up-to-date with all the news!
Subscribe!